I’ve broken down each piece of gear going along on my upcoming trip, and this final post will show you how I load it all into my pack.
(Note: after each item, I will note which Gear Post the piece of gear is described within)
(also, if you want any more specifics on my gear, my Lighterpack list is here)
Main (largest) Compartment
I use a Zpacks Liner Bag on the inside of my pack. The pack itself is heavily water-resistant (due to the DCF material it’s made of, the waterproof zipper, and roll-top closure) but I still use an inner bag to protect those things I REEEEALLLLY don’t want to get wet. These are also the items I will need last when I set up camp each evening.
- Sleeping Bag (Gear Post, Part 2)
- Sleeping Pad – as long as it’s dry (Gear Post, Part 2)
- DIY Pillow (Gear Post, Part 2)
- Sleeping Bag Liner – if I take one (Gear Post, Part 2)
- Spare Clothes (Gear Post, Part 7)
Once all items are smooshed (<— highly technical term) into the liner bag, I will roll it up and clip it shut. It takes up the bottom 1/4 of my pack.
On top of the liner bag lies my tent in it’s stuff sack. (Gear Post, Part 2)

On top of the tent lies my food bag. (Food Post, Part 3)
I try to avoid getting into this bag during the day as much as possible, but I will need in it during my lunch stop – so it sits near the top of the pack. Putting the heaviest item higher up in the pack goes against the standard “rules of packing a backpack,” but it’s what works for me. The first few days are slightly uncomfortable, but my food bag gets 1.5-2 lbs lighter each day.

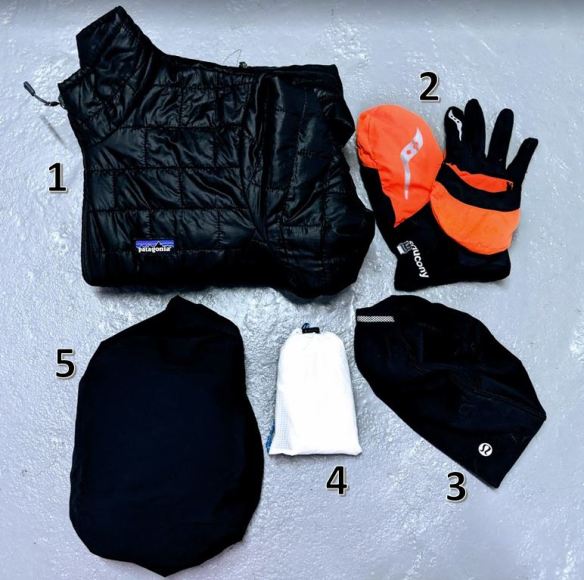
And then, at the very top lies my puffy coat (with eReader wrapped up into it). (Gear Posts, Parts 6 – puffy, Part 3 – eReader)
(Note: if it’s pouring rain when we pack up camp, or we know it’s going to pour rain during the day, I will put the puffy and eReader into the liner bag, along with the other items I want to make sure stay dry)
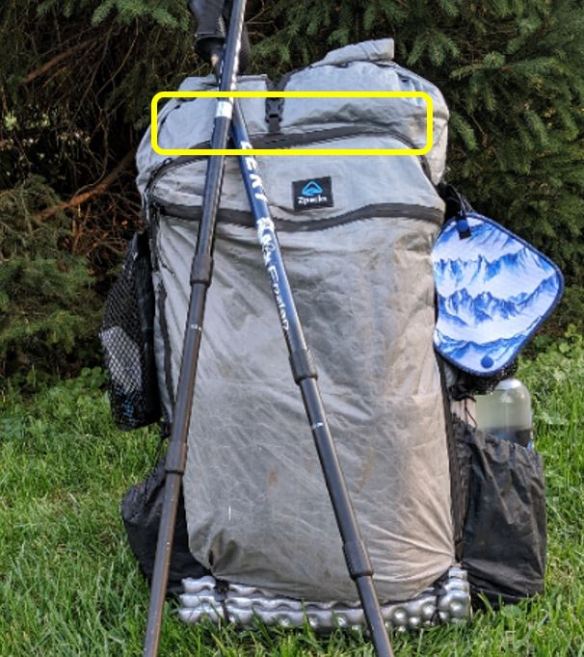
Front Zipper Pocket
This pocket usually holds the items I’ll need access to more frequently during the day.
It’s also the home to one item that just happens to fit here the best – the Tyvek ground sheet I use under my tent. (Gear Post, Part 2)
It folds flat and slides down into this pocket quite nicely….but, it’s not uncommon for it to be slightly damp. Having it in this front pocket keeps it away from my most protected dry gear, and it’s quick to grab and lay on during a mid-day break. Sure, I love the outdoors, and I don’t mind dirt/mud….but something about napping on this ground sheet makes me feel better about putting my guard down around bugs. I can’t explain the madness, it is what it is. Don’t judge.

I will then stuff my rain coat/skirt down in front of the ground sheet. (Gear Post, Part 6)
If it rains, they are quickly accessible….and, if my ground sheet is wet, having rain gear pushing against it it is obviously not a big deal.

Next item in the front pocket is my ditty bag. This thing holds all of the misc objects in my pack….the junk drawer, so to speak. It holds most of my electronics, all of my first aid and toiletries, plus those other small things with nowhere better to store. (Gear Posts, Part 3 – electronics, Part 4 – Misc)

On top of the ditty bag sits my toileting bag. (Gear Post, part 5)
This is the bag I can grab when mother nature calls for something more urgent than a quick pee. (I know, I know, there are more professional or technical terms for this process….urination is one….but, come on, we all say pee.)
For the quick pee, I use a Kula cloth (the blue/white object hanging from my pack). Girls and Guys both use these things, but you’ll primarily see them on the packs of women hikers. Look, we girls can’t just “shake it off” as easily as men, and staying dry is very important. Plus, the less TP we have to pack out, the better. The absorbent side of the cloth is infused with silver for antimicrobial benefits, and the printed side is made of waterproof material (keeping fluid from soaking thru to your hand). If you want to know more, check out their web page.
Left Side of pack
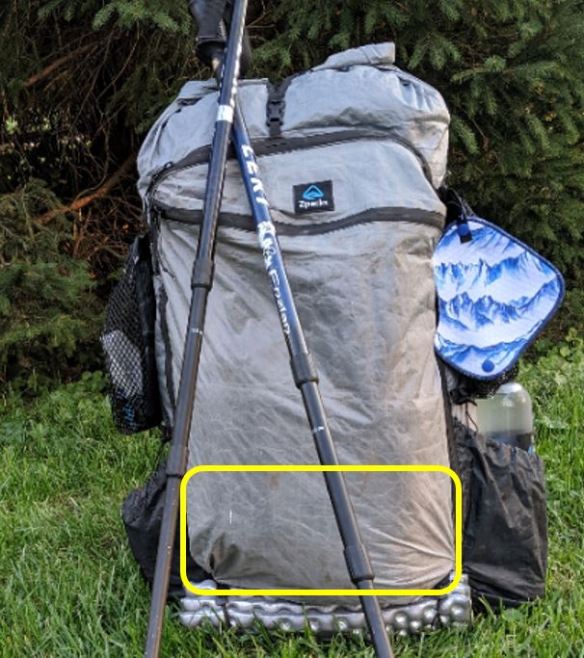
There are two pockets on each side of my pack. On this side the solid lower pocket holds most of my cook kit (Gear Post, Part 1).
I would actually rather store it in my food bag, but until I eat a few days worth of food, it makes my food bag too long to fit horizontally in my pack. Once I’ve eaten for a couple of days, it fits in the food bag nicely. (and it is stored in my bear bag at night, no matter what)

Above that is this year’s addition of a mesh bag. In it I store my water filter. (Gear Post, Part 1)
Having easy access is important, as collecting/filtering water is one reason I stop often on the trail. It being in it’s own pocket keeps it from getting other items wet….but it also allows it to dry throughout the day.

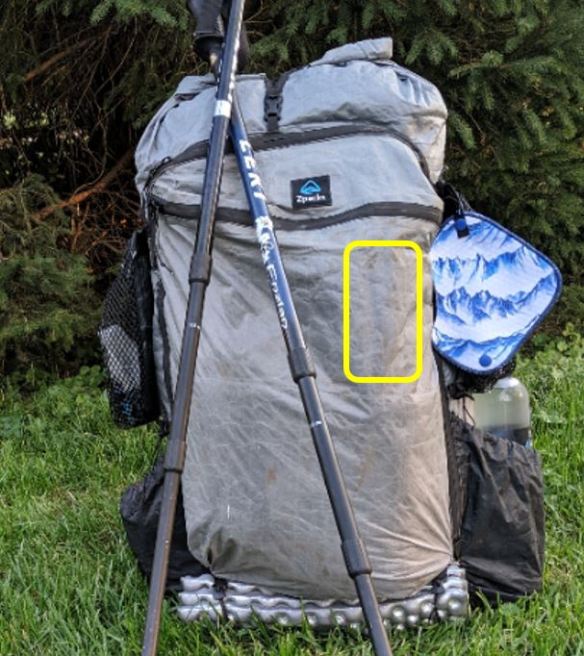
Right Side of pack
The bottom pocket is where I keep my second water bottle. Plain and simple. (Gear Post, Part 1)
Above that is another mesh bag. In it I store my gallon size ziploc used for trash. During my hikes I pick up trash I find along the trail. There is only one planet Earth, and trash just uglies the place up. It’s unfortunate I have to add to my pack weight by picking up the garbage of others…but it is what it is. While my trash bag is stored in my bear bag at night, it’s nice to have it handy during the day.

Shoulder/Sternum/Hip Straps
I have a pocket that is designed to be used on the sternum strap of my pack….but I’ve actually started carrying it front and center on my hip belt strap. It’s easier to access the things in it, and it’s not sitting on top of my chest (anyone with breasts will understand).
In it I store a few small objects…
- Snacks for the day (Food Posts, Part 1 and 3)
- Tripod for my phone (Gear Post, Part 3)
- Macro camera lens (Gear Post, Part 3)
- Head Net and Bug Spray – if needed (Gear Post, Part 4)
- Ibuprofen – if needed (Gear Post, Part 4)
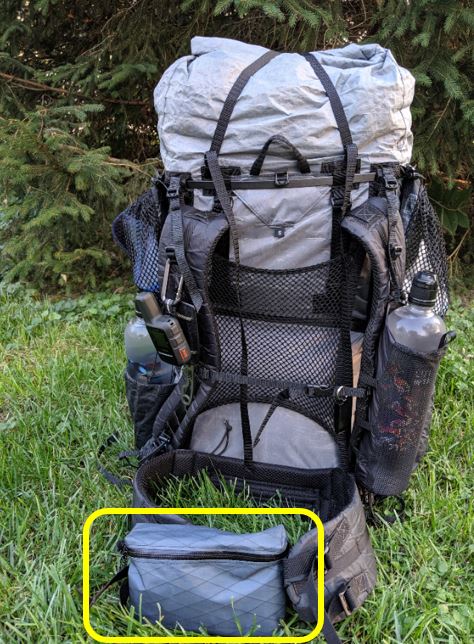
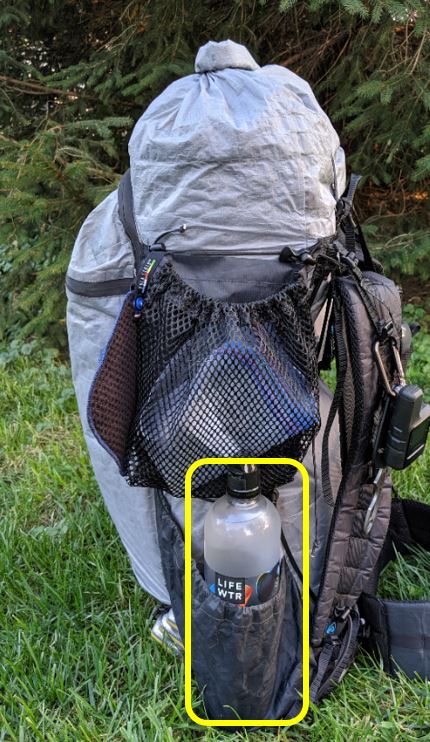
On my left strap I keep my primary bottle of water. (Gear Post, Part 1)
The water bottle holder I use is from Justins UL on Etsy. (one liter size)

On my right strap I hang two objects.
- My satellite emergency tracker/communication device (Gear Post, Part 3)
- My knife (Gear Post, Part 4)
The knife is usually worn by folks on a cord around their neck, but it honestly bugs the crap of out me there. Besides the cord being uncomfortable on the back of my neck, the knife bounces around while walking. You can tuck it down your shirt, or behind your sternum strap, but that makes it unavailable in case of emergency. So hubby helped me figure out a way to attach it to my strap with a carabiner (so I can remove it from my pack and take it inside my tent or carry it to the latrine with me….if I feel the need)

My sit pad is strapped to the front bottom of my pack. (Gear Post, Part 4)
Having it there makes it handy, but it also keeps my pack upright while I’m loading and unloading it.

(not pictured) My hiking pants have a pocket on each thigh. One side is where I store my phone and the other is where I keep my map(s). I have a Buff and sunglasses on my head, and a Road ID bracelet on my wrist. (Gear Posts, Part 3 – phone/case, Part 4 – map, Part 5 – buff/sunglasses)
My total base weight is just under 13.5 without eReader, but including my phone and map. Every year I try to reduce my base weight more and more – this year’s goal was under 15 lbs. Success!!
Adding food takes it to 22 lbs. (but this goes down each day)
Adding 2 liters of water takes it to 26.4 lbs. (ugh)
My apologies for the length of this final pre-hike Gear post – this last one was a doozie. Ha!
Please let me know if you have any questions or comments!!!! I’d love to hear from fellow hikers.
I’ll report in after the trip to let you know what gear worked, what didn’t, and of course there will be some pictures from the journey.
Nej