Superior Hiking Trail, 2019 – The Gear Series (Part 10, loading up)

I’ve broken down each piece of gear going along on my upcoming trip, and this final post will show you how I load it all into my pack.

(Note:  after each item, I will note which Gear Post the piece of gear is described within)

(also, if you want any more specifics on my gear, my Lighterpack list is here)

Main (largest) Compartment

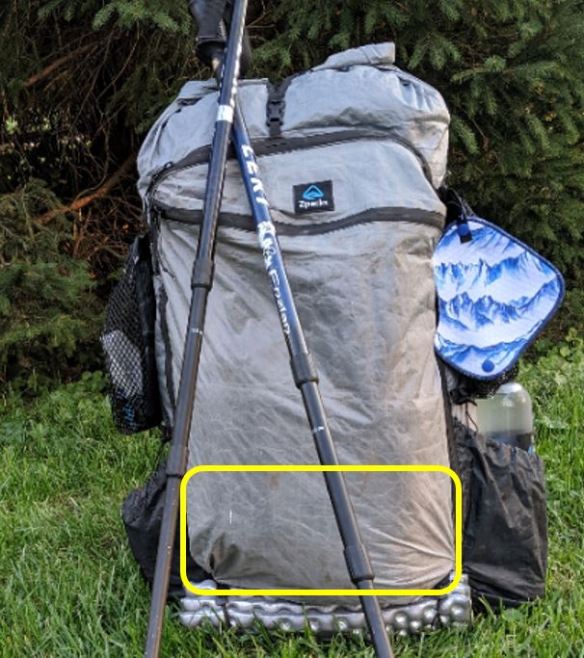
I use a Zpacks Liner Bag on the inside of my pack.  The pack itself is heavily water-resistant (due to the DCF material it’s made of, the waterproof zipper, and roll-top closure) but I still use an inner bag to protect those things I REEEEALLLLY don’t want to get wet.  These are also the items I will need last when I set up camp each evening.

  • Sleeping Bag (Gear Post, Part 2)
  • Sleeping Pad – as long as it’s dry (Gear Post, Part 2)
  • DIY Pillow (Gear Post, Part 2)
  • Sleeping Bag Liner – if I take one (Gear Post, Part 2)
  • Spare Clothes (Gear Post, Part 7)

Once all items are smooshed (<— highly technical term) into the liner bag, I will roll it up and clip it shut.  It takes up the bottom 1/4 of my pack.
Capture2

On top of the liner bag lies my tent in it’s stuff sack. (Gear Post, Part 2)

Capture4

On top of the tent lies my food bag. (Food Post, Part 3)

I try to avoid getting into this bag during the day as much as possible, but I will need in it during my lunch stop – so it sits near the top of the pack.  Putting the heaviest item higher up in the pack goes against the standard “rules of packing a backpack,” but it’s what works for me.  The first few days are slightly uncomfortable, but my food bag gets 1.5-2 lbs lighter each day.

Capture5

And then, at the very top lies my puffy coat (with eReader wrapped up into it).  (Gear Posts, Parts 6 – puffy, Part 3 – eReader)

(Note:  if it’s pouring rain when we pack up camp, or we know it’s going to pour rain during the day, I will put the puffy and eReader into the liner bag, along with the other items I want to make sure stay dry)
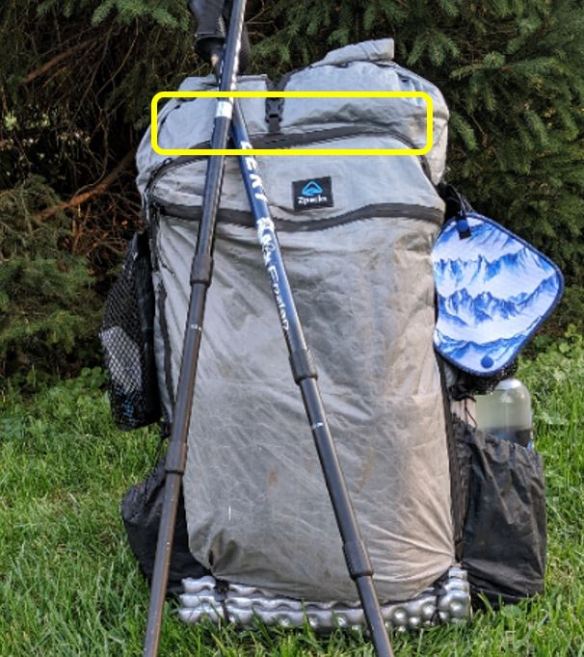
Capture6

Front Zipper Pocket

This pocket usually holds the items I’ll need access to more frequently during the day.

It’s also the home to one item that just happens to fit here the best – the Tyvek ground sheet I use under my tent.  (Gear Post, Part 2)

It folds flat and slides down into this pocket quite nicely….but, it’s not uncommon for it to be slightly damp.  Having it in this front pocket keeps it away from my most protected dry gear, and it’s quick to grab and lay on during a mid-day break.  Sure, I love the outdoors, and I don’t mind dirt/mud….but something about napping on this ground sheet makes me feel better about putting my guard down around bugs.  I can’t explain the madness, it is what it is.  Don’t judge.

Capture8

I will then stuff my rain coat/skirt down in front of the ground sheet.  (Gear Post, Part 6)

If it rains, they are quickly accessible….and, if my ground sheet is wet, having rain gear pushing against it it is obviously not a big deal.

Capture9

Next item in the front pocket is my ditty bag.  This thing holds all of the misc objects in my pack….the junk drawer, so to speak.  It holds most of my electronics, all of my first aid and toiletries, plus those other small things with nowhere better to store.  (Gear Posts, Part 3 – electronics, Part 4 – Misc)

Capture10

On top of the ditty bag sits my toileting bag.  (Gear Post, part 5)

This is the bag I can grab when mother nature calls for something more urgent than a quick pee.  (I know, I know, there are more professional or technical terms for this process….urination is one….but, come on, we all say pee.)

For the quick pee, I use a Kula cloth (the blue/white object hanging from my pack).  Girls and Guys both use these things, but you’ll primarily see them on the packs of women hikers.  Look, we girls can’t just “shake it off” as easily as men, and staying dry is very important.  Plus, the less TP we have to pack out, the better.  The absorbent side of the cloth is infused with silver for antimicrobial benefits, and the printed side is made of waterproof material (keeping fluid from soaking thru to your hand).  If you want to know more, check out their web page.
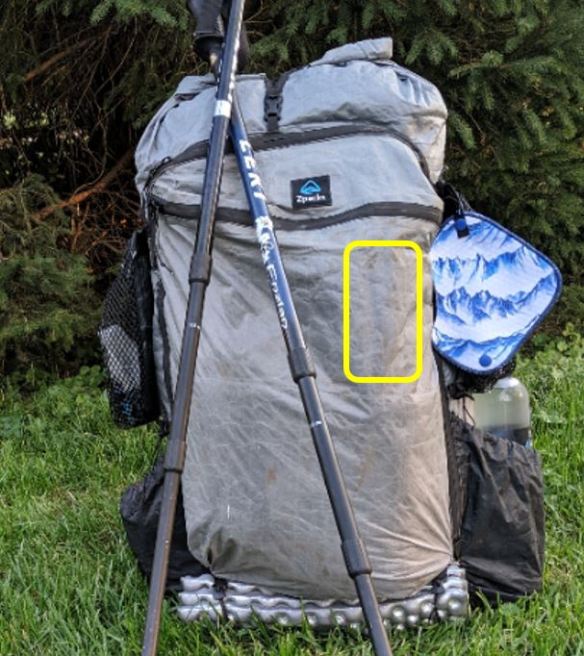
Capture11

Left Side of pack

There are two pockets on each side of my pack.  On this side the solid lower pocket holds most of my cook kit (Gear Post, Part 1).

I would actually rather store it in my food bag, but until I eat a few days worth of food, it makes my food bag too long to fit horizontally in my pack.   Once I’ve eaten for a couple of days, it fits in the food bag nicely.  (and it is stored in my bear bag at night, no matter what)

Capture12

Above that is this year’s addition of a mesh bag.  In it I store my water filter.  (Gear Post, Part 1)

Having easy access is important, as collecting/filtering water is one reason I stop often on the trail.  It being in it’s own pocket keeps it from getting other items wet….but it also allows it to dry throughout the day.

Capture13

Right Side of pack

The bottom pocket is where I keep my second water bottle.  Plain and simple.  (Gear Post, Part 1)
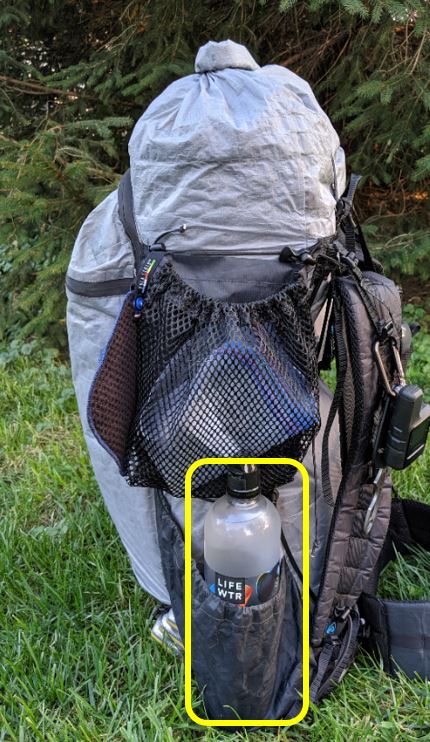
Capture14

Above that is another mesh bag. In it I store my gallon size ziploc used for trash.  During my hikes I pick up trash I find along the trail.  There is only one planet Earth, and trash just uglies the place up.  It’s unfortunate I have to add to my pack weight by picking up the garbage of others…but it is what it is.  While my trash bag is stored in my bear bag at night, it’s nice to have it handy during the day.

Capture15

Shoulder/Sternum/Hip Straps

I have a pocket that is designed to be used on the sternum strap of my pack….but I’ve actually started carrying it front and center on my hip belt strap.  It’s easier to access the things in it, and it’s not sitting on top of my chest (anyone with breasts will understand).

In it I store a few small objects…

  • Snacks for the day (Food Posts, Part 1 and 3)
  • Tripod for my phone (Gear Post, Part 3)
  • Macro camera lens (Gear Post, Part 3)
  • Head Net and Bug Spray – if needed (Gear Post, Part 4)
  • Ibuprofen – if needed (Gear Post, Part 4)
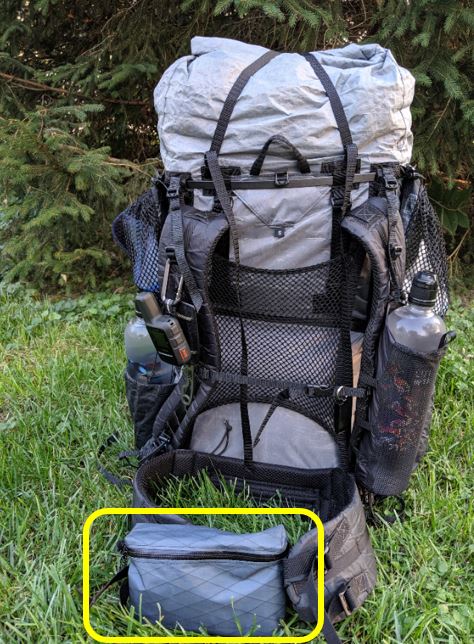
Capture17

On my left strap I keep my primary bottle of water.  (Gear Post, Part 1)

The water bottle holder I use is from Justins UL on Etsy.  (one liter size)

Capture19

On my right strap I hang two objects.

  1. My satellite emergency tracker/communication device (Gear Post, Part 3)
  2. My knife (Gear Post, Part 4)

The knife is usually worn by folks on a cord around their neck, but it honestly bugs the crap of out me there.  Besides the cord being uncomfortable on the back of my neck, the knife bounces around while walking.  You can tuck it down your shirt, or behind your sternum strap, but that makes it unavailable in case of emergency.  So hubby helped me figure out a way to attach it to my strap with a carabiner (so I can remove it from my pack and take it inside my tent or carry it to the latrine with me….if I feel the need)

Capture20

My sit pad is strapped to the front bottom of my pack.  (Gear Post, Part 4)

Having it there makes it handy, but it also keeps my pack upright while I’m loading and unloading it.

Capture7

(not pictured)  My hiking pants have a pocket on each thigh.  One side is where I store my phone and the other is where I keep my map(s).  I have a Buff and sunglasses on my head, and a Road ID bracelet on my wrist.  (Gear Posts, Part 3 – phone/case, Part 4 – map, Part 5 – buff/sunglasses)

My total base weight is just under 13.5 without eReader, but including my phone and map.  Every year I try to reduce my base weight more and more – this year’s goal was under 15 lbs.  Success!!

Adding food takes it to 22 lbs. (but this goes down each day)

Adding 2 liters of water takes it to 26.4 lbs.  (ugh)

My apologies for the length of this final pre-hike Gear post – this last one was a doozie.  Ha!

Please let me know if you have any questions or comments!!!!  I’d love to hear from fellow hikers.

I’ll report in after the trip to let you know what gear worked, what didn’t, and of course there will be some pictures from the journey.

Nej

Superior Hiking Trail, 2019 – The Gear Series (Part 1, Cooking and Drinking)

Here it is, the blog series you’ve been waiting for…..

(recognizing that might be a slight exaggeration)

(moving on…)

Backpacking Gear!!!!!!!!!!!!

Yes…there are a million posts out there talking about backpacking gear.  What’s so special about this Backpacking Gear series??

I don’t know really.

I suppose it’s special in that it’s my series, talking about my gear, carried on my back.

Honestly, I’m writing these posts so future-Nej can look back at them and use them to make informed decisions on her backpacking gear.  Do I think there are strangers out there who will give a f*ck what Nej takes backpacking?  Maybe, maybe not.  I mean, I read other people’s posts…why wouldn’t some of you end up here for the same reason??

Yakety, yakety – get with the gear talk already!!!

OK, here we go!!!

Without food and water, life ends – fairly quickly.  I’ve already broken down the exact food I’m taking on this trip (here)…so this post will be more about the non-consumable gear aiding in said eating and drinking.

I figured I’d tackle these two topics in the order of importance.  Water – needed every 3-4 days, then food – needed every 3-4 weeks.

Water

Sidenote:  I once had a teacher in junior high, that would prompt the entire class to sing a jingle from a commercial (??) that none of us had ever seen.

“Coooooool, cleeeeeeaaaarrrrrr, wateerrrrrrrrrrrr”

He’s also the guy that chucked an overhead projector across the room when he couldn’t bear his class’s antics any more, but I digress.

Water System

There is usually an abundance of water on the SHT, but I still manage to over-pack it.  (they say you pack your fears, right?)  I usually go on trail with the capacity to carry 3-4 liters.  I rarely, if ever, actually carry to capacity.  If I’m doing an overnight hike locally and I know there isn’t a water source, or if I know there isn’t a water source at my campsite, I might carry three (to get me thru dinner, breakfast, and hiking the next day to the next source).   But mostly, I carry 2 liters away from each water source fill-up.

While that might seem excessive to some, there is a tiny method to my madness.  You see, water is heavy…..stupid heavy.  So, filling up 2 liters actually prompts me to drink more water in an effort to reduce the weight on my back.

The campsites along the SHT are almost always located at or very near a water source, and you tend to cross water sources consistently throughout the days’ hike.  But filling up  those 2 liters at each stop has worked pretty well….for me.

I’ve used multiple methods to filter water along the trail, but this year I’m switching things up….slightly.  Instead of the normal Sawyer Squeeze and Cnoc bag, I’ll be using a BeFree filter (with 1 liter bladder, 2.2 oz).  Fill the bladder with “dirty” water….squeeze clean water into bottles (or drink directly from the filter).

So…….there’s my water system.

“That’s all I have to say about that.”  Forrest Gump

Food

If you read my previous post, you’ll see that I carry about 50% foods needing cooked and 50% not.   For the 50% needing cooked, 99% of the time I use the “add boiling water to dried foods in a freezer bag” method. (I hate doing dishes.)  The remaining 1% is making instant coffee directly in my mug.

Mmmmmmmm….trail coffee.

Cook System

Let’s break the gear down a little….

  1. 750ml Toaks titanium mug /w lid and handles (3.8 oz, including mesh bag also pictured):  plenty big enough to boil the water needed for coffee and my breakfast at the same time
  2. Big Sky International insulated food pouch (1.4 oz):  after adding hot water to the freezer bag, your food needs 15-20 minutes to re-hydrate.  If you put the freezer bag in an insulated pouch of some sort, it keeps the heat from dissipating faster than you’d prefer.
  3. Titanium long-handled spoon (.7 oz):  I can’t remember what brand I’m using right now.  The bowl of the spoon is polished (smooth).  I prefer this especially when eating foods that have any kind of cheese in them.  Cheese sticks to a textured bowl like nothing else!   The long handled spoon is a pain to store in my pack, but it’s a fair trade for being able to eat out of freezer bags without your hand ending up covered in whatever food lines the bag.  “Hi bear!  I hung my food bag outside of camp, but my hands still smell like tacos.  Please come eat me.”
  4. Soto Amicus stove (without igniter, 2.5 oz):  fold the “legs” out and screw it onto the top of your fuel canister and you’re ready to go.  It’s lightweight, but not flimsy – and I rarely need to use a windscreen when cooking.
  5. Spark-Lite Emergency Fire Starter kit (.7 oz): as I mentioned above, I did not get a stove with a built-in igniter.  Why???  Because I’ve yet to have a stove with an igniter NOT stop working on me.  I see no reason to pay extra for a feature that eventually fails, at the worst time.  (the igniters fail, not the stoves)  I usually take a regular lighter to light my stove, but I thought I’d put that in my Ditty Bag instead (we’ll break it’s contents down in a future post), and store my emergency flint striker in my cook kit.  No specific reason for the switch really, I just wanted to try something new.
  6. Teenage Mutant Ninja Turtles bandana….circa 1987 (1.1 oz):  oh yeah!  I found this beauty when we were cleaning out the childhood closet, belonging to my husband, at his parent’s house.  It’s crap for tying to my pack to soak up sweat or water….but it’s stellar for use as a pot holder.  (Because I will NOT repeat the “spill 750 ml of boiling water down my leg” event of 2018.)  I also wrap the stove up in it when it’s stored in my pack….so it won’t “clank clank clank” with every footstep.
  7. Mesh bag:  this is the bag in which my pot resides.  Actually, everything in this picture (sans the insulator pouch and spoon) goes into the pot that is stored inside the mesh bag.  I’ve used a rubber band to keep the lid on my pot in the past, but I prefer using the mesh bag.  Rubberbands break or get lost ridiculously easily.

Not pictured:  I also keep a gallon ziploc bag in my food bag for trash.

What is your preferred method for treating water on trail??  When backpacking do you cook food or maybe prefer to cold soak?  I’d love to hear what you have to say!!!

Until next time,

Nej


Keto Backpacking Food Options (Part 3, the rest of the story)

Over the last week I’ve released a few of the ideas I’ve come up with to “deal” with my Keto way of eating while I’m on trail.  I’m sick of tuna….and the standard instant potatoes, ramen noodles, and instant oatmeal are super high in carbs.  So, if you’re interested in a few of my ideas, you can read about them here and here.

I’m pretty sure the rest of the food I’m taking on my upcoming trip can be summed up in one single post, rather than an individual post for each bar, meat stick, and drink mix.

You’re welcome.

So, here is a picture of all the food I’m taking with me on a 5 day backpacking trip coming up later this month.

Food

136.7 ounces, 8.54 lbs, 3873.74 grams

(my goal is between 1.5 and 2 lbs of food per day, and this falls smack dab in the middle of that range)

As I’ve said in my other posts….I am not a professional nutritionist, nor a professional backpacker (man, that would be a sweet job title!).  If you have dietary restrictions, allergies, or an aversion to things that are yellow, this might not be the meal plan for you.

(you’re looking for all of the yellow now, aren’t you?)

One more thing before I go on….I’m going to list products by name.  I’m getting no kick backs or free product by doing this.  I’m not sponsored, nor have I been sent samples to try.  My opinion has been asked for by…..NO ONE.

food 1

Row #1:  Breakfast (Mon-Fri)

Perfect Keto Instant Coffee Packets (Mocha):  <2 net carbs per packet

  • I usually drink my coffee at home with a tiny amount of heavy cream, and that’s it.  But, I will spoil myself on the trail….plus the additional fat content helps fuel my body and keep energy high.

Mountain House Eggs and Bacon:  7 carbs per serving

  • I know, I know….this isn’t the lowest carb breakfast option in the world….but I had a hard time finding freeze dried eggs that weren’t powdered.  Powdered eggs don’t work well for freezer bag cooking.  Sure, if you’re carrying a skillet they work great.  (great = “great”)  But for the ‘add water and eat’ method, these are the option I’ve found.  I’d LOVE to hear from those of you who’ve found something else!!!
  • I did add a some Epic bacon “bits” to the mix…because who doesn’t love MORE bacon?!?!

Olde Thompson Everything Bagel Seasoning:  <1 net carbs

  • For this trip I’m keeping the seasoning in an empty prescription bottle.  The idea of carefully shaking seasoning out of a lightweight plastic bag gave me anxiety.  I mean, you KNOW it’s going to all come out at once, in the first day’s breakfast…leaving me with zero seasoning the rest of the week.

food 2

Row #2:  Snacks (Sun-Thurs)

Amino Vital “Action” drink mix packet:  Zero carbs (uses Stevia)

  • As I said before, I will spoil myself on trail.  While the filtered water (whether from a stream, a river, a lake, or even the occasional beaver pond) always tastes great along this particular trail, I will still add drink mix packets to my food bag.  This particular packet has electrolytes, which is never a bad thing.   In my setup, I keep one water bottle on the left side pack strap, easy to reach while hiking.  When leaving camp each morning, I will usually put a drink packet in that first bottle of water.  It’s habit, it’s tasty, and it breaks up the monotony of drinking nothing but plain water all week.
  • Next to that is a ziploc-style bag full of the cubes from one Keto Brick.  (for more details, read my earlier post here)  I keep them in the sternum/chest strap pocket on my pack…..and will snack on them throughout the day.

Quest Bars:  usually around 4-6 net carbs

  • OK, look.  I know some of you will have issues with this choice.  It’s a packaged bar, full of fillers and man made ingredients.  I think there is even some soluable corn fiver in there….so I’m not even sure they can be called gluten free.  (???)
  • But here’s the thing….they hold their shape after being crammed into a food bag all week.  They don’t become a melty puddle of muck in hot weather.  And when it’s cold out, it takes quite a while for them to become “teeth breakingly” solid.

Ultima Replenisher Lemonade packets: Zero carbs (uses Stevia)

  • I don’t always use these, but I do always have a few in my pack for each day just in case.  Electrolytes and a nice lemonade flavor = can’t go wrong.


food 3.JPG

Row #3:  Lunch (Sun-Thurs)

Mama Lupe Low Carb Tortillas:  3 net carbs

  • Yup, tortillas.  I know, not the usual choice of someone on Keto….but there aren’t any options out there not needing refrigerated.  I mean, I shouldn’t say there aren’t ANY, but I can say I haven’t found them yet.

Salami and Pepperoni (discs and sticks):  Zero (or very low) carb – depending on brand

  • Self explanatory – meat, meat, meat, protein, protein, protein

Tahini:  Zero (or very low) carb – depending on brand

  • Instead of peanut butter, almond butter, etc….I bring tahini (sesame butter) in a cute little animal shaped squeeze pouch (thanks Christina!!!).

Put it all together: I will take a tortilla, add a pepperoni stick (and maybe some discs), squeeze on a good helping of tahini, roll it up….and Bob’s your uncle.  (what does that even mean??)  Anyway….this is my replacement for my pre-Keto favorite trail lunch…..the always popular peanut butter and jelly in pita bread.

food 4

Row #4:  Dinner (Sun-Thurs)

  • This is the moment I realize I didn’t give myself both items for night 1.  You were here to witness it.
  • I’ll throw one in before I leave, if I remember.
  • (sigh)

Each day there will be a freezer bag with an “add boiling water and eat” meal.  The first, third, and fifth bags contain this.  The second dinner is a Beef Taco meal from Next Mile Foods (removed from their packaging and put in a lightweight freezer bag, 4 net carbs).  The fourth dinner is a Buffalo Ranch Chicken meal, also from Next Mile Foods (8 net carbs).

There is also a Quest bar for dessert, if wanted……or for eating right before bed on cold nights.  (giving your body food to process right before bed will create an internal heat to help keep you warm – leaving the tent to do some jumping jacks will do the same thing, but isn’t as much fun as being able to stay in your sleeping bag)

Soooo….there you have it, five days of backpacking food.

Oh, and for those that want to know….there are bears where I’m going for this hike, and wolves, and many little woodland creatures itching for a good tortilla….so food needs to be stored properly.  Unfortunately, finding a tree with limbs high enough, and large enough, to hang a bear bag is difficult, if not sometimes impossible.  (and let’s be real, have you seem me try to throw?)  Bear canisters are heavy, and hard to pack.  (ugh)

So I use a bear bag made by Ursak (8.8 oz).  You put your food into it (usually lined with an inner scent “proof” bag), close it up tight, and tie it to a tree well outside of your camp.  If a bear finds it, he might smooooosh the contents….or leave some drool on the outside of the bag (but I own a Saint Bernard folks, there’s no slobber in the word like Saint slobber).  If tied to the tree properly, the bear won’t GET anything for his efforts – which is the whole idea.

The green inner bag (in the picture below, 2.1 oz including clip) is a scent “proof” bag I found on Amazon (I’ve used Opsaks in the past, but the ziploc-style closure always fails before the end of my trip, so I’m trying something new this year).  I usually package each row of foods in it’s own gallon ziploc-style bag.

I know that seems excessive….bagged foods, into a gallon bag, in a scent proof bag, in a bear bag.  But….being organized is important.  If you’ve ever stumbled into camp after a long day of hiking, and then had to dig around in a bag to find what you’re looking for…..or tried to get your meal cooked before the oncoming rain begins….you’ll understand the Russian Nesting Dolls packing method.

(I’m using a simple chip clip to keep it closed after twisting the bag shut.)

Inner Foodouter Food

Questions, comments, suggestions?????????

Keto Backpacking Food Option (Part 2 -the experiment)

If you follow a Keto way of eating, it’s difficult to eat the traditional retail dehydrated/freeze-dried meals (Mountain House, Backpacker’s Pantry, etc).  The carb count is usually eye opening, and explains why those things taste good (mmmmm….so much sugar).

I decided to try and make my own, and (spoiler alert) it wasn’t a failure.

First step:  pick a favorite recipe my husband makes for dinner (yep, he does the majority of the cooking in our house, I’m spoiled, I’m aware).

Second step:  from the list of ingredients, determine shelf stable replacements.

Third step:  politely and sweetly ask hubby if he would be interested in finding the right ratio of ingredients to make it work.

Fourth step:  test the product (for texture and flavor), note any changes needed.

Fifth step:  test the final product (with above changes)….but, fail the test because you add hot water to the ziploc, seal the bag, place the hot pot back on the stove, and when you turn around you see that you, in fact, did NOT get the ziploc fully sealed, and watch the entire bag’s contents spill across the kitchen counter, over the edge, and onto the floor.

(the dogs LOVED this step)

(I would recommend skipping step five, and moving straight to step six.)

(Unless you want your kitchen to smell like cheesy bacon chicken soup for a few days…even though you think you get it all cleaned up, only to find more of it under the microwave a day later.)

(sigh)

Sixth step:  repeat step five, but this time give OCD-level attention to making sure the bag is fully closed.

Note:  the freezer bag version tastes very close to the regular stovetop version….with the exception that the freeze dried chicken never fully softened.  (al dente – even after a 20 minute “soak” in hot water)

Cheesy Chicken Bacon Soup

Ingredients

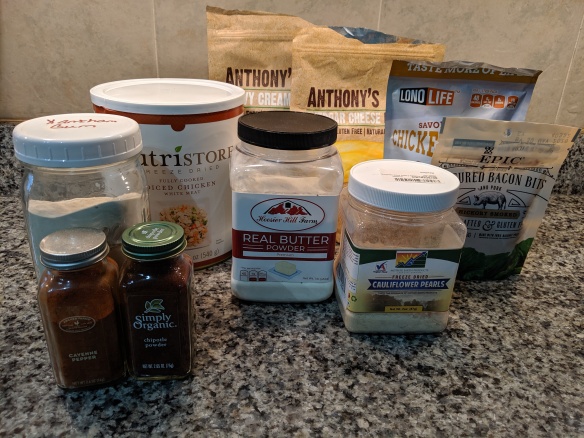
1/4 cup freeze dried cauliflower (I used Mother Earth Products Freeze Dried Cauliflower Pearls, purchased on Amazon – but I might suggest you look for a product with less carbs, it wasn’t until after I used the product that I noticed there was some added sugar – 4 net carbs per .5 oz…come on folks, why must we sugar everything??)

1/2 cup freeze dried chicken (I used Nutristore Freeze Dried Chicken, purchased on Amazon – zero carbs)

1 packet chicken bone broth (I used LonoLife Chicken Bone Broth, purchased on Amazon – 3 carbs per packet, no added sugar)

1 tsp powdered butter (I used Hoosier Hill Farm Real Butter, purchased on Amazon, <1 gram carb per tablespoon)

1/8 cup powdered heavy cream (I used Anthony’s Heavy Cream Powder, purchased on Amazon – 1 gram carb per tablespoon)

1/8 cup powdered cheddar cheese (I used Anthony’s Premium Cheddar Cheese Powder, purchased on Amazon – 4 grams carbs per 2 tablespoons)

1/8 tsp salt (we mainly use kosher salt at our house)

1/8 tap xantham gum, to thicken (I used Namaste Foods, purchased on Amazon – zero net carbs)

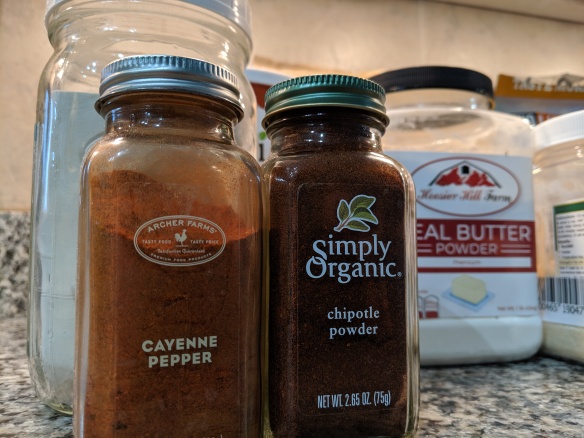
1/8 tsp chipotle powder, or adjust to taste (I used Simply Organic brand seasoning….purchased at Whole Foods maybe?)

1/8 tsp cheyenne powder, or adjust to taste (I used Archer Farms brand, which I believe is sold at Target.)

2 tbsp bacon “bits” (I used Epic brands uncured “bits”, purchased from Amazon – zero carbs….I’m guessing this should be a product that is added as a final step just before leaving on your trip….and maybe not be something stored longer-term inside your prepared meal….they aren’t freeze dried, they are merely uncured bits of bacon – also this brand was MUCH more expensive, I’ve found cheaper at places like Costco since doing this test)

IMG_20190824_074630

IMG_20190824_074616IMG_20190824_074609

IMG_20190824_074559

Add everything to a quart FREEZER ziploc-style bag.  If you use a regular bag, instead of freezer bags, your hot water will likely melt the bag while cooking in the field.

Seal the bag, removing as much air as possible….and place in your chosen food bag for the trip.  (cooking time/instructions above in this post)

When cooking make sure the ingredients are covered with the amount of water you use.  I found 1 1/2 cups of water worked well.  Wait 20 minutes for ingredients to hydrate and heat.

I’ve said before I’m not a professional nutritionist or backpacker…..I don’t have the exact macro breakdown….but my rough math shows it coming in at under 10 net carbs per “bag/serving” using the products I chose.

Do you make your own Keto freeze bag meals?  I’d love to hear about your favorites!!!


(P.S.  I’m not sponsored by any of the above product manufacturers or retailers.  All ingredients were purchased with my own moolah.)

Keto Backpacking Food Options (Part 1, the Keto Brick)

Hubby and I decided to switch from being heavy carbovores to following a low carb, higher fat (Keto) diet nearly one year ago.  In fact, the only reason we didn’t switch 3 weeks sooner than we did was because of a quickly approaching week long backpacking trip.  The “food” (“food” = carbs, sugar, carbs, carbs and did I mention carbs?) had already been planned, purchased, and packed.  More importantly, I had no idea what I was doing when it came to Keto, so I figured eating the way I had been eating my whole life for 3 more weeks wasn’t going to do much more damage.   Right?

We switched to Keto the day after I got back (Oct 1st, 2018) and we haven’t looked back since.  Well….that’s a lie.  Every time I think about planning food for a backpacking trip lasting more than 1-2 nights, I fondly remember how easy and cheap it was to eat horribly on the trail.  (sigh)

Which leads me to where I am now, sitting on the couch writing blog posts about backpacking food options for people who follow a more Keto way of eating.  I’ve personally scoured the internet looking for similar posts, and hopefully can do my part to make it that much easier for the next person.

Now, I want to make this abundantly clear before I go any further…I am not a nutrition expert, or a backpacking expert.  I’ve stumbled along this journey making plenty of mistakes…and I’m sure there are quite a few more to come.

So, moving on…..

One food backpackers always have plenty of in their food bags are bars.  Luna Bars, Cliff Bars, Kind Bars, Pro Bars, Bobo’s bars….the list goes on and on.  Unfortunately, they are all FULL of carbs and added sugars.

One night while lying in bed watching Keto vlogger YouTube videos, I cam across one person reviewing a Keto Brick.  I was intrigued and ordered one as soon as their was available stock (more on that below).

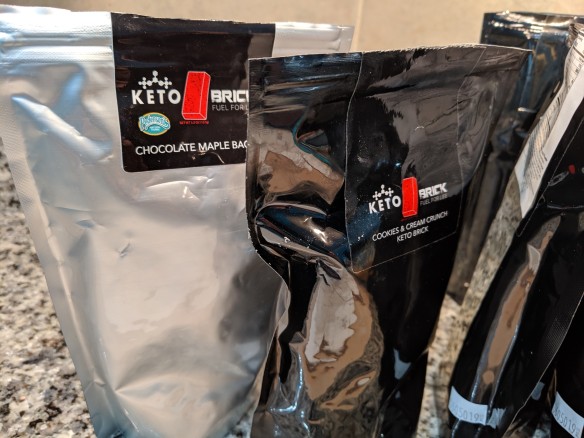
Keto Bricks are the creation of Robert and Crystal Sikes, some sort of Keto Bodybuilding dream team who only came up with the 1000 calorie meal replacement bars as a way to make eating quicker, easier, and more efficient in their own lives.   If I remember correctly the story goes something like this (please excuse me for any errors, I’m going off of memory)…..they make bricks for themselves…people saw them and started asking….they started making them for people they knew….those people told people, who told people…..and the rest is history.   There are new batches released once a month, and they sell out within minutes (although, they’ve ramped up production quite a bit and I have fewer issues when I need a restock these days).  Robert and Crystal have since added 2-3 additional flavors with more on the way.  (I keep requesting Everything Bagel flavored bricks – fingers crossed.)

The original flavor was Mocha, then they added Cookies and Cream Crunch, Cinnamon Crunch, and finally a Maple Bacon version.  I’m not a cinnamon fan, so you won’t get a review from me on those…but the Mocha and Cookies/Cream are pretty solid.  I haven’t tried the Maple Bacon yet – but I have two bricks ready and waiting in my pantry.

Anyway….backpacking, we’re here to talk backpacking…focus.

So, if you’ve had a Keto Brick, you know that they are a bit…..clumsy (?) to eat in their brick form.  I do not have a “flip top head” (name that commercial) nor a double jointed jaw….so the full brick is an awkward and crumbly experience.

I noticed one day while placing an order that there is a disclaimer telling buyers the bricks are shelf stable.  They go on to say the bricks may melt if you order them in the summer and the package has to sit in your mailbox.  But, never fear, if that happens we are merely supposed to let them cool back down to a solid form and they are fine to eat.

This got my wheels spinning.  If them melting on accident is ok, why can’t you melt them on purpose to make them easier to eat???

I thought back to my days of helping mom make 400 million mints and chocolate discs for a family wedding.  I promptly got on Amazon and ordered some silicone molds (gummy bears and small little cubes), and melted my first brick the night the molds arrived.

I suggest melting them for 1 minute in the microwave, stirring them a little, then continuing 30 seconds at a time until they are liquid.  From there you fill the molds (I use a spatula to keep the fluid level with the top of the mold (they are easier to remove if they aren’t overflowing), and put them in freezer to make them solid.  Honestly, you can probably just leave them on the counter, or put them in fridge to accomplish the same result, but I find they set SUPER fast in the freezer – allowing me to melt, solidify, and package all within the same hour.

Each brick is a 1000 calorie meal replacement with “perfect” keto macros.  (81% fat, 13% protein, 6% carb)  The list of ingredients seems pretty solid to me (remember…me = not an expert), but many other reviewers who likely know what they’re talking about seem to agree.    And, if you think about it, aren’t bodybuilders pretty strict about what goes into their bodies for fuel?

Anyway….I find that the little mini pieces from one full brick fit into a snack size ziploc bag quite nicely.  Each morning at camp, after eating breakfast, I’ll retrieve my snacks for the day from my food bag and add them to a hip belt or chest pocket on my pack for easy access snackage while I hike.  I’ll nosh on a Keto Brick throughout the entire day (supplementing with other foods at lunch and dinner) to keep my energy levels consistent for the hike.

img_20190824_075507-1

img_20190824_075454

img_20190824_080315-1img_20190824_080424-1img_20190824_140243-1img_20190824_140341-1

Legal stuff I don’t know if I’m required to add, but will just in case.  —>  I did not receive free Keto Bricks.  I was not asked to review Keto Bricks.  I was not promised free Keto Bricks for a review (good or bad).  Robert and Crystal have never heard of me.

Except I ask for “everything bagel” flavored bricks every time their system sends me a survey….so maybe they know me as the crazy everything bagel lady?  Who knows?!?!?!

If that’s the case, and they are reading this….Robert, Crystal….I’ll taste test those Everything Bagel Bricks for you, you just have to say the word!  🙂